Picture this: you've spent two years restoring a vintage automobile to showroom condition. The paint is flawless. The engine purrs with authority. Every chrome accent catches the light exactly the way it should. You climb in, back it out of the garage for the first time, press the brake pedal—and feel it sink toward the floor with the resistance of a wet sponge.
If you've spent any time around vintage vehicles, you know that sinking feeling intimately. And if you've ever tried to solve it by applying the same brake bleeding procedure you'd use on a modern car, you've probably discovered something frustrating: the old methods often don't work as cleanly on old iron.
That's not a coincidence. It's engineering history.
Brake bleeding on vintage cars isn't just an older version of the same job you'd perform on a modern vehicle. It's a genuinely different discipline—one that intersects metallurgy, hydraulic fluid chemistry, rubber compound degradation, and brake system architectures that haven't rolled off a production line in decades. Once you understand why these older systems behave the way they do, the path to solving their problems becomes considerably clearer.
Part One: The Architecture Problem—Understanding What You're Actually Working With
Before you can bleed a brake system effectively, you need to understand what you're working with. And here's where vintage vehicles immediately diverge from anything built in the last forty years.
The Single-Circuit Master Cylinder: One Failure Point for Everything
Vehicles manufactured before roughly 1967 in the United States—and some models well into the early 1970s in other markets—used single-circuit master cylinders. This is perhaps the most important structural difference between vintage and modern brake systems, and it's one that many technicians trained on contemporary vehicles have never encountered in practice.
Here's what it means in plain terms: a single master cylinder feeds all four wheel brakes from one hydraulic circuit. There's no redundancy, no backup, no failsafe split. When Federal Motor Vehicle Safety Standard No. 105 took effect in 1968 and made dual-circuit master cylinders mandatory for new American vehicles, it fundamentally changed brake system architecture—so that if one side failed, the other remained functional.
In a vintage single-circuit system, that safety net doesn't exist.
Why does this matter for bleeding? Because any air anywhere in the circuit can affect braking at all four corners simultaneously. A small bubble that might create minor pedal inconsistency in one circuit of a modern dual-circuit system becomes a system-wide problem in a vintage setup. You cannot afford to leave residual air at any point in the circuit. The standard for thoroughness is simply higher.
Drum Brakes, Geometry, and the Air-Trapping Problem
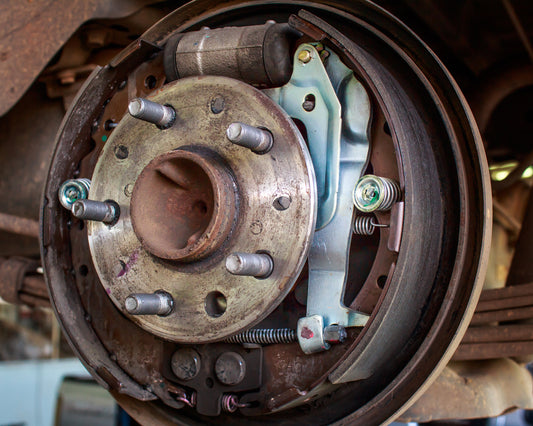
The majority of vintage vehicles used drum brakes at all four corners—and even those from the transitional era of the late 1960s and early 1970s typically paired front disc brakes with rear drums. Both configurations present bleeding challenges that modern disc-only systems don't.
Drum brake wheel cylinders are small, horizontally-oriented hydraulic actuators. Depending on their orientation relative to the backing plate and the angle of the brake line connection, air can accumulate in pockets that gravity-only bleeding simply cannot reach. The bleeder screw on a wheel cylinder may not sit at the absolute highest point of the cylinder's internal bore when the vehicle is on a level surface. On rear axles with certain suspension geometries, this orientation can shift further—creating genuine air-trapping situations that no amount of gravity bleeding will resolve.
Residual Pressure Valves: The Component Most People Forget
Here's a detail that rarely appears in general-purpose bleeding guides but matters enormously in vintage drum brake systems: residual pressure valves.
These small valves—typically located inside or adjacent to the master cylinder—are specifically designed to maintain a small amount of residual pressure in the brake lines, usually around 8-10 psi for drum brake systems. Their purpose is to keep wheel cylinder rubber cups lightly expanded against their bores, preventing air ingestion when the brakes aren't applied and helping maintain a consistent pedal feel.
During bleeding, these valves must be accounted for. A functioning residual pressure valve means that gravity bleeding may not generate sufficient differential pressure to move fluid effectively through the entire circuit. A damaged or stuck valve that doesn't open properly will impede fluid flow regardless of what bleeding method you use—and diagnosing this as the root cause of a stubborn air problem requires knowing the valve exists in the first place.
Part Two: The Chemistry of Neglect—What Time Does to Vintage Brake Fluid
The architecture challenges are significant. But for many vintage vehicles—particularly those emerging from extended storage—the condition of the fluid itself is where the real trouble begins.
Moisture, Contamination, and a Dangerously Lowered Boiling Point
DOT 3, DOT 4, and DOT 5.1 brake fluids are all polyethylene glycol-based, and they share one defining characteristic: they are hygroscopic, meaning they actively absorb moisture from the atmosphere over time. This is actually intentional design—glycol-based fluids absorb moisture rather than allowing it to pool separately in the lowest points of the circuit, where it could cause localized corrosion and vapor pockets.
The problem is what that absorbed moisture does to performance over the years. Fresh DOT 3 fluid has a dry boiling point of 401°F (205°C). Fully contaminated DOT 3 fluid—defined by the SAE as fluid containing 3.7% water content—has a wet boiling point of only 284°F (140°C). That's a drop of 117°F from fluid that's simply been sitting in a brake system absorbing atmospheric moisture. In a vintage vehicle with heavily loaded drum brakes working hard on a long downhill grade, fluid temperatures can approach and exceed that threshold, leading to vapor lock and sudden brake fade.
For a vehicle that's been sitting in a garage for five, ten, or twenty years, you should assume the brake fluid is at or near full contamination. It is not a matter of if it needs replacement—it's a matter of what else you'll find when you start looking.
The Rubber Component Problem—and Why It's More Serious Than It Sounds
This is the part that separates experienced vintage vehicle technicians from everyone else, and it's worth reading carefully.
The hydraulic seals, cups, and flexible hoses in vintage brake systems were manufactured from rubber compounds that are now decades old. Early synthetic rubber formulations used in wheel cylinder cups, master cylinder seals, and flexible brake hoses from the 1950s through the 1970s are prone to swelling, cracking, and breakdown when exposed to modern brake fluid formulations—particularly if those components have already been partially degraded by years of contaminated fluid sitting against them.
Here is the critical point: a vintage brake system that has been sitting with old, moisture-laden fluid may have rubber components on the verge of failure. When you introduce fresh fluid through any bleeding procedure, you may simultaneously be dissolving the last structural integrity holding a deteriorated rubber cup together.
This doesn't mean you shouldn't bleed the system—it means you must inspect it first. Fluid that has turned dark brown or black, or that shows visible particulate matter in suspension, is telling you a specific story: internal rubber components have already begun breaking down and those breakdown products are now contaminating the fluid. In these cases, brake fluid replacement must be preceded by complete hydraulic component inspection and very likely a full rebuild of the master cylinder and wheel cylinders before any bleeding procedure begins.
The DOT 5 Question: Why Silicone Fluid Isn't the Simple Answer It Appears to Be
Spend any time in vintage car restoration circles and you'll encounter enthusiastic advocacy for DOT 5 silicone brake fluid. The logic is superficially appealing: DOT 5 is non-hygroscopic, meaning it doesn't absorb moisture the way glycol-based fluids do. For a show car that sits for extended periods between uses, that sounds ideal. The reality is more complicated—and the complications matter specifically in vintage systems.
- Compressibility: Silicone fluid is measurably more compressible than glycol-based fluid under pressure. In a vintage vehicle already dealing with the inherently longer pedal travel and larger fluid volumes of drum brake systems, this additional compressibility can compound into a noticeably soft, imprecise pedal feel.
- Air entrainment: DOT 5 silicone fluid does not dissolve entrained air as readily as glycol-based fluids. Air bubbles introduced during the bleeding process tend to remain as discrete bubbles rather than being absorbed into the fluid medium—making complete air removal not just important but absolutely critical, and harder to confirm.
- The mixing problem: If a vintage system previously ran glycol-based fluid and wasn't completely flushed and dried—including every internal passage, bore surface, and hose interior—residual glycol fluid and DOT 5 silicone fluid will not mix. They separate into a two-phase fluid that can behave unpredictably under hydraulic pressure.
The decision to convert a vintage vehicle to DOT 5 silicone fluid should be made deliberately, with full understanding of these tradeoffs, and ideally in conjunction with a complete hydraulic system rebuild that genuinely starts from a clean slate.
Part Three: Why Common Bleeding Methods Fall Short on Vintage Systems
Understanding the limitations of conventional bleeding approaches on vintage systems isn't an academic exercise—it's practical knowledge that saves time and prevents real frustration on the shop floor.
Gravity Bleeding: Simple, But Rarely Sufficient
Gravity bleeding—opening a bleeder screw and allowing fluid to flow downward by head pressure alone—is the most frequently recommended approach in vintage car forums and general repair guides. It requires minimal equipment and no special skill. It also has significant limitations for the systems we've been discussing.
Gravity bleeding relies entirely on fluid head pressure to move fluid through the circuit. It cannot overcome air pockets trapped in geometrically unfavorable positions relative to the bleeder screw. It provides no positive pressure to dislodge air bubbles clinging to internal surfaces. In a circuit with a functioning residual pressure valve maintaining positive line pressure, gravity bleeding may not generate sufficient differential pressure to move fluid effectively at all. For a vintage system emerging from years of storage, or one with the geometric air-trapping issues described earlier, it frequently falls short.
Traditional Vacuum Bleeding: A Hidden Complication in Vintage Systems
Vacuum bleeding methods draw fluid through the circuit by applying suction at the bleeder screw. This approach works well in many modern applications and has the practical advantage of requiring only one operator. For vintage systems specifically, however, there's a complication that deserves clear attention.
Vintage vehicles often have bleeder screws that have been in place for decades. Even with careful preparation, the thread engagement between an aged bleeder screw and an old brake casting may not provide a perfectly air-tight seal under vacuum conditions. When suction is applied, small amounts of atmospheric air can be drawn in around the threads—not from within the hydraulic circuit, but from outside it. The result is that the fluid exiting the bleeder shows bubbles that aren't from the hydraulic circuit at all. You may believe you're observing a persistent air problem in the system when you're actually watching atmospheric air being drawn past deteriorated threads—making it genuinely difficult to determine when the system is actually clean.
The Two-Person Pedal Method: Fine in Theory, Risky in Practice
The traditional pump-and-hold method also carries specific risks when applied to vintage single-circuit master cylinders with aged internal components. Aggressive pedal pumping can push deteriorated master cylinder cups past the compensation ports, causing damage to seals that were already marginal. It also requires precise coordination between operators to avoid drawing air back into the circuit when the bleeder is open and the pedal reaches the bottom of its travel—on a vintage system where rubber component integrity is already a concern, this is mechanical stress you'd prefer to avoid entirely.
Part Four: Reverse Fluid Injection—Why It Works So Well on Vintage Systems
This is where the approach changes significantly, and the technical reasoning is worth understanding clearly rather than simply accepting as received wisdom.
Working With Physics Instead of Against It
Reverse fluid injection—the methodology behind Phoenix Systems' brake bleeding technology—pushes fresh fluid upward from the lowest point of the hydraulic circuit toward the master cylinder reservoir at the top of the system. That reversal of conventional fluid flow direction isn't arbitrary. It's grounded in a physical principle that happens to be exceptionally well-suited to vintage brake system geometry.
Air rises. Always.
In conventional bleeding, you're asking trapped air bubbles to travel against the direction of fluid flow to reach the nearest bleeder screw—which, as we've established, may or may not be at the topmost point of the circuit given the geometric realities of vintage wheel cylinder orientation. You're fighting physics. With reverse injection, fresh fluid entering at the bottom of the circuit pushes air ahead of it. Because air rises naturally in a liquid medium, the direction of travel for those air bubbles aligns with the direction of fluid flow—upward, toward the master cylinder reservoir where they can escape freely to atmosphere. You're working with physics.
The Master Cylinder Reservoir as Exit Strategy
Rather than forcing trapped air to navigate the entire length of a brake line back to a bleeder screw, reverse injection routes air out through the master cylinder reservoir. The reservoir is open to atmosphere. Air bubbles don't need to fight gravity or fluid flow dynamics—they're carried upward by the advancing fluid column and released. For vintage systems with single-circuit master cylinders, where a bleeder screw in a geometrically awkward wheel cylinder position might never quite evacuate a stubborn air pocket, this change in exit strategy can make the difference between a system that feels right and one that always seems to have just a little sponginess left.
Gentler Pressure Protects Aged Components
Phoenix Systems' reverse bleeding approach operates at relatively low working pressures compared to aggressive pedal-pumping or high-pressure methods. For vintage brake systems where internal rubber components may be borderline compromised, this isn't a minor detail—it's meaningful protection. You're not subjecting those aged wheel cylinder cups and master cylinder seals to peak hydraulic pressure spikes that could accelerate their deterioration or push a marginal component into outright failure. The system gets thoroughly bled with significantly less mechanical stress on components that may have decades of wear already behind them.
Thread Leakage Is Eliminated
Because reverse injection operates under positive pressure from the bleeder screw end rather than vacuum suction, atmospheric air being drawn inward past deteriorated bleeder screw threads is no longer a concern. Positive pressure pushes outward through any thread gaps—it doesn't pull air inward. On vintage systems with aged castings and bleeder screws, the diagnostic clarity this provides is genuinely valuable.
Part Five: A Practical Step-by-Step Protocol for Vintage Vehicles
Theory is useful. A structured procedure you can actually follow in the garage is better. Here's how to approach brake bleeding on a vintage vehicle with appropriate technical thoroughness.
Step 1—Assess Before You Touch Anything
This step is non-negotiable, and it's the one most often skipped by enthusiastic owners eager to get their restoration on the road.
- Pull a fluid sample. Use a clean transfer syringe to extract a small amount of fluid from the master cylinder reservoir. Fresh or lightly used glycol fluid is clear to light amber. Moderately degraded fluid turns noticeably darker. Fluid that's dark brown, nearly black, or shows visible particulate matter in suspension tells you that rubber component breakdown has already occurred—and you need to know this before you proceed.
- Examine every flexible brake hose. Run your fingers along the length of each hose and look for external cracking, surface hardening, or swelling. A brake hose that has deteriorated internally may be blocking fluid flow or harboring air pockets within its own inner lining—a problem that no amount of careful bleeding will resolve until the hose itself is replaced.
- Inspect all bleeder screws. Look for corrosion, rounded hex heads, and evidence of previous over-tightening. Frozen bleeder screws on vintage vehicles are extremely common. Apply penetrating oil to any questionable bleeder screws and give it a minimum of 24 hours before attempting to move them.
- Consider the residual pressure valves. If the vehicle uses drum brakes at any corner, determine whether functioning residual pressure valves are present and whether they appear to be operating correctly. A failed valve won't open adequately and will impede complete fluid circulation regardless of bleeding method.
Step 2—Make Component Decisions Before Proceeding
Your fluid sample and inspection results determine your next move. There are really only two paths forward:
- Path A: The fluid shows moderate contamination but no particulate matter, hoses are supple and show no obvious deterioration, and bleeder screws are accessible. You can proceed to bleeding with appropriate care and monitoring.
- Path B: The fluid shows heavy contamination with visible particulate, hoses show deterioration, or the inspection raises concerns about the integrity of internal rubber components. In this case, proceed to complete hydraulic system rebuilding—master cylinder, wheel cylinders, hoses—before any bleeding procedure begins. A freshly bled system built on compromised components is not a reliable brake system.
Step 3—Execute the Reverse Bleed
With the system confirmed ready, here's the procedure:
- Connect the Phoenix Systems reverse bleeder to the bleeder screw at the wheel farthest from the master cylinder—on most left-hand-drive vehicles, this will be the passenger-side rear wheel.
- Remove the master cylinder reservoir cap and monitor this reservoir throughout the entire procedure. Fresh fluid will exit here as it displaces contaminated fluid upward through the system. Keep a clean rag nearby.
- Introduce fluid slowly and steadily. Observe the reservoir for air bubbles rising and releasing at the surface. You'll see contaminated, darker fluid being displaced upward first, followed progressively by the clean, fresh fluid you're introducing below.
- Monitor the reservoir level continuously. Do not allow it to overflow—and critically, do not allow it to run dry at any point. A dry reservoir during reverse bleeding can introduce air into the master cylinder itself, creating the exact problem you're trying to eliminate.
- Continue until the fluid appearing at the reservoir shows no air bubbles and has the clear, clean color of fresh glycol fluid.
- Work through each wheel position systematically if the circuit geometry or inspection findings indicate individual paths warrant separate attention.
Step 4—Verify Before the Vehicle Moves
- Reinstall the master cylinder reservoir cap and confirm it's properly sealed.
- Apply firm, steady pressure to the brake pedal and hold it for a full 30 seconds. A solid pedal that holds its position indicates a successfully bled, properly sealed system. Any gradual sinking under constant force indicates either residual air or a fluid leak that must be addressed before the vehicle moves.
- Set the fluid level to the correct fill mark—not overfull, not underfull.
- Conduct a careful, low-speed stop test in a controlled environment before returning the vehicle to normal operation.
Always consult your vehicle's service manual and follow proper safety procedures throughout this process. If any aspect of the hydraulic system is outside your experience or comfort level, consult a qualified mechanic with vintage vehicle experience before proceeding.
The Bigger Picture: Why Getting This Right Actually Matters
There's a dimension to this work that goes beyond technical procedure, and it's worth acknowledging directly.
Vintage brake systems represent a specific, fascinating moment in engineering history. The engineers who designed these single-circuit master cylinders and drum brake wheel cylinders were working at the frontier of what was then understood about hydraulic force multiplication, rubber compound chemistry, and manufacturing tolerance. They made deliberate, carefully reasoned choices—about residual pressure valves and bore diameters and circuit layouts—that reflected the best available knowledge of their time. Some of those choices look conservative from a modern vantage point. Some were genuinely elegant solutions to difficult problems with the materials and manufacturing capabilities available.
When we work on these systems today, we're translating between two eras of engineering knowledge—applying modern understanding of hydraulic fluid behavior and air dynamics to architectures conceived decades before that understanding was fully developed. Reverse fluid injection technology didn't exist when these vehicles were designed. But its core principle—working with the natural tendency of air to rise in a liquid medium, routing that air toward a controlled exit point, doing so at pressures that don't stress aged components—is entirely compatible with the hydraulic logic these older systems embody.
Over 40,000 Phoenix Systems reverse bleeding systems have been put to work by professional mechanics, military maintenance technicians, and dedicated vehicle owners. That accumulated real-world experience translates directly to vintage vehicle applications, where the cost of getting the hydraulic system wrong on the first attempt is considerably higher than on modern vehicles that can simply return to a service bay next week.
The vintage vehicle represents automotive craftsmanship preserved across time. The engine work, the bodywork, the interior restoration—all of it is ultimately in service of a machine that needs to be driven, which means it needs to stop reliably. Getting the brakes right—understanding the specific challenges these systems present, approaching the bleeding procedure with appropriate care, and using a methodology that works with their geometry and physics rather than against it—is how you honor both the engineering and the history.
And it's how you make sure that first drive out of the garage ends the way it should: with a firm pedal, confident stops, and the road ahead.
This information is provided for educational purposes. Always follow manufacturer specifications for your specific vehicle and consult your vehicle's service manual throughout any brake service procedure. Refer to the Phoenix Systems product manual for complete instructions and safety information. If you're unsure about any aspect of your vehicle's brake system, consult a qualified mechanic before proceeding.